Fiat 500 Forum banner
21 - 40 of 80 Posts
Really interested to see how you get on. The existing H19 halogen is a combined high/low beam and the other tungsten light is a W5 that sits inside the enclosure. What do you mean by the high beam and the position light?
Sorry for my bad explanation. I bought on the one hand the h19 bulb ( low and high beam) and on the other hand the bulb that makes the parking light for the inside of the headlight. I hope I get the pack soon and do the test.
 
Discussion starter · #23 ·
When you receive them can you post some close up photos of the units but also let us know know how you got on with fitting. When I tried the Osram H4 ones (that I'd been told were H19 compatible) they had a lovely white colour and beam but it was all over the place. Great to see photos of dipped and main beam with one halogen and one new LED H19. Good luck!
 
When you receive them can you post some close up photos of the units but also let us know know how you got on with fitting. When I tried the Osram H4 ones (that I'd been told were H19 compatible) they had a lovely white colour and beam but it was all over the place. Great to see photos of dipped and main beam with one halogen and one new LED H19. Good luck!
Count on it. I will do a detailed review of the product as soon as I can try it. Supposedly they arrive to me next Monday. I hope to be able to tell you something on Tuesday or Wednesday.

Thanks!
 
If you can find a white wall or garage door after changing only one bulb, a pic from the center of the windshield shows the pattern & brightness comparison, like this one on my 1-st gen 500e:

A pic from ahead of the car doesn't really show much:
 
Have you received the LED kit? Have you had a chance to install yet?
I just picked up the package and it looks good. I won't be able to start working on it for a couple of days. The position lights come, the h19 led bulbs for low and high beams also come. Inclye also the necessary electronics so that they do not give error (canbus adapter). On the other hand they also include two bellows to replace the covers of origin with more space to be able to cover the electronics that adapts to the canbus.

For now it seems that the thing promises. In a couple of days I will send you the pictures.
I'm also really interested to see how you get on. If you get a chance to post also the method of changing them it would be really helpful (especially if they turn these 80s yellow lights into 20s white lights!)
 
I have already been able to make the change. It's pretty simple although you then have to fit the electronics in a safe place but there is a hole that allows you to hook it to the chassis and leave it well. The h19 bulb is very easy to change. You push from bottom to top and it comes out in one piece. The position one is a bit more complicated if you have big hands. It is to turn it 180º counterclockwise and it comes out with the bracket. You pull the bulb out and replace it with the LED bulb.

They light up much more (now I have the headlights in position 1) but they make the cut well and without problems so far.

I bought the pack here: Xenonpertutti

Image

Image
 
I have already been able to make the change. It's pretty simple although you then have to fit the electronics in a safe place but there is a hole that allows you to hook it to the chassis and leave it well. The h19 bulb is very easy to change. You push from bottom to top and it comes out in one piece. The position one is a bit more complicated if you have big hands. It is to turn it 180º counterclockwise and it comes out with the bracket. You pull the bulb out and replace it with the LED bulb.

They light up much more (now I have the headlights in position 1) but they make the cut well and without problems so far.

I bought the pack here: Xenonpertutti

View attachment 112260
View attachment 112261
Wow that looks much better. For someone who is not experienced in fitting anything complicated, how easy is this to do? Are the instructions pretty simple? Would you say it takes maybe 30 minutes? Thanks for your help!
 
Wow that looks much better. For someone who is not experienced in fitting anything complicated, how easy is this to do? Are the instructions pretty simple? Would you say it takes maybe 30 minutes? Thanks for your help!
The whole operation took me an hour and a half, but if I were to do it again now it would take no more than 20 minutes. All my experience prior to this change was reduced to having replaced a couple of halogen bulbs when they burned out in my old car. It all comes down to having small hands for the parking bulbs, I counted on the help of my wife, a little patience, tact and common sense.

They come without instructions and the only instruction I received, was a WhatsApp audio in Italian in which the only thing I understood is that "it's very easy".

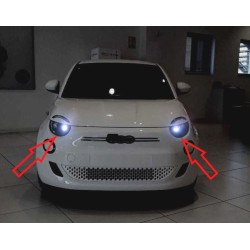
The reality is that it is simple. First you remove the h19 bulb by pulling with your finger from the bottom upwards and then you already have access to the w5w bulb which is removed by turning 180° counterclockwise the bulb holder. The assembly is done in reverse. The problem is that the electronics that makes the bulb compatible with canbus and the ballast are large and does not fit inside the headlight cover. So I made a "cross" with a cutter and pass through it the two wires to hold the electronics and the ballast to the inside edge of the chassis and ready. The installation has been very good, it allows me to return to halogen if I need to take it to the FIAT and the gain in illumination is quite large.

The rubber bellows that are sent with the kit are too big for our car and I decided not to use them. I have used the original covers with the cross cut to pass the wires.
 
Thanks thats appreciated. Those Italian voice instructions are classic! Sorry it is a little hard to understand what you mean by making a cross - if you are able to send a couple of pictures of what you mean that would be super helpful. Thanks for your tips already!
 
Discussion starter · #33 ·
I have already been able to make the change. It's pretty simple although you then have to fit the electronics in a safe place but there is a hole that allows you to hook it to the chassis and leave it well. The h19 bulb is very easy to change. You push from bottom to top and it comes out in one piece. The position one is a bit more complicated if you have big hands. It is to turn it 180º counterclockwise and it comes out with the bracket. You pull the bulb out and replace it with the LED bulb.

They light up much more (now I have the headlights in position 1) but they make the cut well and without problems so far.

I bought the pack here: Xenonpertutti

View attachment 112260
View attachment 112261
Do you have any photos of the beam pattern? Also, photo of how much extra stuff hanging out of the back? many thanks
 
Discussion starter · #35 ·
Wow! That is a lot of additional electronics. When I fitted the Osram H4 LEDs there was nothing at all and they worked fine but of course the pattern was entirely wrong. Thank you so much for your posts. I am going to take the plunge and order from the Italian site albeit with help from a colleague in my Milan office :)
 
Wow! That is a lot of additional electronics. When I fitted the Osram H4 LEDs there was nothing at all and they worked fine but of course the pattern was entirely wrong. Thank you so much for your posts. I am going to take the plunge and order from the Italian site albeit with help from a colleague in my Milan office
You are welcome. We are on the forum to help each other.

Let us know when you get it. You have to order two products, the h19 bulbs pack and the w5w parking bulbs.
 
Thanks thats appreciated. Those Italian voice instructions are classic! Sorry it is a little hard to understand what you mean by making a cross - if you are able to send a couple of pictures of what you mean that would be super helpful. Thanks for your tips already!
I am referring to making some cross cuts in the rear plastic headlight cover so that the wires can be passed through it. If you do the assembly as I do you have to pass two, the one that feeds the ballast and then the one that goes from the control unit to the bulb. I didn't take pictures of my cover, but the idea is something similar to this attached.

Image
 
21 - 40 of 80 Posts